Easily Cut A Wooden Sign with Your CNC
Wooden signs are all the rage currently, so we decided we needed to design and create some signs that signified home was where the heart was. First, we wanted to come up with the outline of each state. Since we live in Arkansas, we started with that. Finding a vector file of your home state should be very easy with a simple google search. Wikipedia is usually a really good place to start.
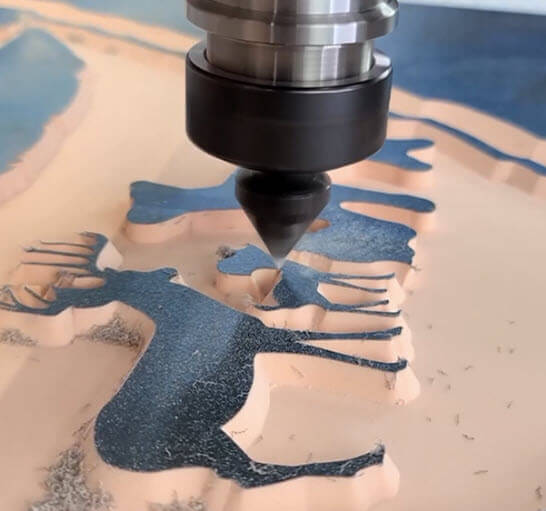
Choosing a bit is an important decision. You typically want to go with as large of a bit as the design will allow. The larger the bit, the faster you can run the machine and cut out your design. Thankfully, most programs, including the one we used, will show a simulation of the cut and let you know if the bit you choose will cut out the shape, or if it's too large and you need to use a smaller bit. For this design, the largest bit we could use would be a 1/8 endmill and still get in all the detail.
Tools Today offers a great variety of compression bits. Doing a quick search for 1/8 compression bits lead me to bit #46180-K solid carbide compression router bit. This one has a special Spektra™ coating, that extends the life of the bit and keeps the bit cooler. We inputted the specifications of the bit into carbide create and were ready to make the carve.

Now, we needed to choose the bit style. Typical styles are up cut, down cut, ball, vee, and compression. Up cut is great for plastic and metals because it brings the material up the bit and keeps the bit from recutting the waste material. Using this on wood, however, will leave the top of the material with tear out, and that is not something we wanted. A down cut bit is great for wood. It pushes the waste material down and leaves a tear out free top surface but could leave tear out on the bottom of the material. This is where the compression bit comes into play.
A compression bit is the best of both worlds. The part of the bit closest to the tip is up cut and the back end is down cut. That’s why it’s called a compression bit. It compresses the chips into the center of the bit. This makes it great for plywood, laminates and MDF when you need both the top and bottom edges clean. Since we’re cutting plywood, the compression bit was our choice.
Once we found a vector file of the state we wanted, we fired up Adobe Illustrator. Any vector-based program will do, but we’ve found Illustrator to be the best. A good, free, alternative is Ink-Space. Knowing we wanted the word home in the center of the state, it was important to find a font that connected all the letters together, that way, when the negative space was cut out, the wording would hold onto the state shape and the sign would stay together.
“Home is where the Heart is.” That phrase was the whole inspiration for this project. As we were discussion the design of our sign, it hit us like a flash of light, we had to change the letter O into a heart. This required a bit of program knowledge and design manipulation. There are plenty of online tutorials out there for each program, and after a bit of time, you’ll have it mastered.
Once the design was done in Illustrator, it was time to import it into the CNC program. I’m using a Shapeoko 3 XXL, so we used the free program that comes with the machine called Carbide Create. This program is actually free for anyone to use, regardless if you own a CNC or not. It simply takes vector files and creates GCode. GCode is the information that tells a CNC how to do its job. There are many other programs that will allow you to do this. Another free option is a web-based application that Inventables puts out called Easel. This one, while limited, is probably the easiest one to use for CNC newcomers. Another great alternative is Aspire. This one is most CNC professionals go to program and therefore has a serious price tag attached.
Once the file was imported into Carbide Create it was time to set up the dimensions, decide which bit would be used, and feeds and speeds. We wanted the sign to be lightweight but large. We decided to use ¼” Baltic Birch plywood from our local hardware big box store. We decided on our stock being 2’ x 2’, that way, for odder sized shapes, the word home would still fit inside and be proportionate. After imputing the size of our stock, it was time to decide on the proper bit for our sign.
After the material was clamped down, we fired up Carbide Motion (Shapeoko’s GCode Sender) and started the cut. One of the learning curves with CNC work is how much you can push the boundaries of the machine and the bit. For our first try, the feeds, speeds, and depth of cut we’re very conservative and it took many passes to cut out the sign. Since then, we’ve been able to cut the sign out in one pass with the Amana Compression bit taking the total time from 26 minutes down to 3! Don’t be afraid to push the machine and bits, they’re more robust than you think!
The final sign came out great and looks beautiful when hung on a wall or door. So far its been a big hit! Now we just have to repeat this process for 49 more states! Let’s get cutting!
Watch the full video Quick Cutout Of A Wooden Arkansas Home Sign On The Shapeoko CNC Router // DIY Woodworking, by Myers Woodshop!