What to Do with a Trim Router Other Than Trim Laminate
Table of Contents
- Trim Router Uses: Practical Ways to Get More from a Compact Router
- 1) Classic Uses
- 2) Decorative Edgework
- 3) Joinery & Groove Work
- 4) Template & Pattern Routing
- 5) Specialty Applications
- 6) Practical Setup Tips
- 7) Safety Essentials
-
- Festool MFK 700: The Premium Choice for Precision and Versatility
- FAQs
Trim Router Uses: Practical Ways to Get More from a Compact Router
Trim routers started life as laminate trimmers, but they’ve grown into precision tools that earn a permanent spot on the bench. Below are focused, no-nonsense ways to put one to work—without hauling out a full-size router.
1) Classic Uses
Trimming laminate and veneers
Use a flush-trim bit with a bearing to remove overhang in light passes. Keep the base flat, maintain steady pressure, and work against the bit’s rotation to avoid chatter.
Flush-trimming solid-wood edging
For banded plywood or veneered panels, a trim router excels at bringing edging perfectly flush without risking a snipe from larger machines. Skim the last 1–2 mm in multiple passes for a glue-line finish.
2) Decorative Edgework
Small profiles: roundovers, chamfers, ogees
Shallow profiles (e.g., 1/16"–1/4" roundovers) are ideal. The lighter tool weight keeps you in control on narrow parts, drawer fronts, and shelves.
For really small profiles, check out our miniature router bits.
Quick edge breaks
Keep a small roundover or 45° chamfer bit in the trim router to soften sharp edges on furniture components and shop projects. One light pass is usually enough.
3) Joinery & Groove Work
Shallow dadoes and rabbets
With an edge guide, fence, or straight template, a trim router cuts clean grooves for back panels, dividers, and light-duty cases. Make depth in stages to protect the bit and the workpiece.
Hardware and hinge mortises
Paired with a simple jig, the trim router delivers consistent mortise depth and crisp shoulders for hinges, strikes, and inlayed hardware—especially on doors and lids.
Template-guided joints (small projects)
Use pattern bits with bearing guides to repeat small box joints, recessed lids, and registration features where accuracy matters more than brute removal rate.
4) Template & Pattern Routing
Duplicating small parts
Attach a MDF or acrylic template and follow it with a top- or bottom-bearing bit. This is a fast, accurate way to make identical handles, feet, brackets, or decorative cutouts.
Shaping consistent curves
Rough-cut on the bandsaw, then bring the edge to the line with the trim router. Take light, overlapping passes and keep your hands well clear of the bit path.
5) Specialty Applications
Inlays & sign making (with templates)
Lettering and inlay cavities are straightforward with guide bushings or dedicated templates. Use sharp spiral or solid-carbide bits and sneak up on final depth for clean edges.
Shelf-pin holes (with jigs)
A drill guide works, but a trim router with a bushing and template yields plumb, chip-free holes—especially near edges or veneered surfaces.
Routing plastics & soft metals
With the correct bit geometry, reduced speed, and light feed pressure, you can machine acrylics, PVC, HDPE, and non-ferrous metals like aluminum. Secure the work, clear chips often, and avoid heat buildup.
6) Practical Setup Tips
- Make multiple light passes. It’s faster than fixing tear-out and keeps small bits cooler.
- Feed against rotation. You’ll feel the tool “bite” and track predictably along the edge or fence.
- Support the base. Add an auxiliary base for narrow parts; stability equals cleaner results.
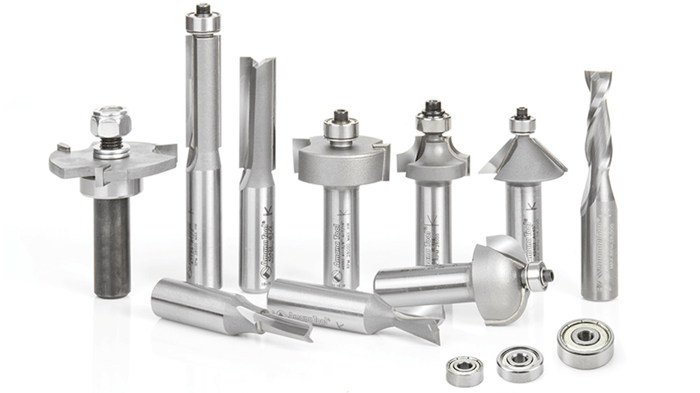
- Use the right bit. Spiral bits for clean shearing cuts; compression spirals for veneers; bearing-guided bits for templates.
- Dial in speed. Slow down for plastics and soft metals; medium–high for hardwood edge profiles.
- Test on offcuts. Confirm depth, direction, and finish before touching the workpiece.
7) Safety Essentials
- PPE: eye and hearing protection, and dust management when possible.
- Workholding: clamp or fixture the piece—never chase moving stock with a spinning bit.
- Grip and stance: two-handed control, balanced stance, cord/hoses clear of the base.
- Bit condition: sharp, clean, and properly tightened; let dull or gummed-up bits sit out.
- Incremental depth: increase depth in stages to reduce kickback risk and heat.
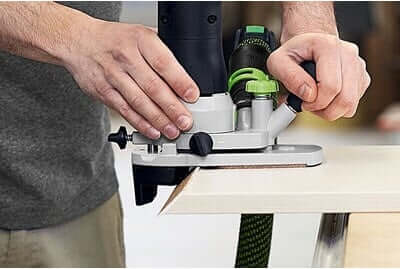
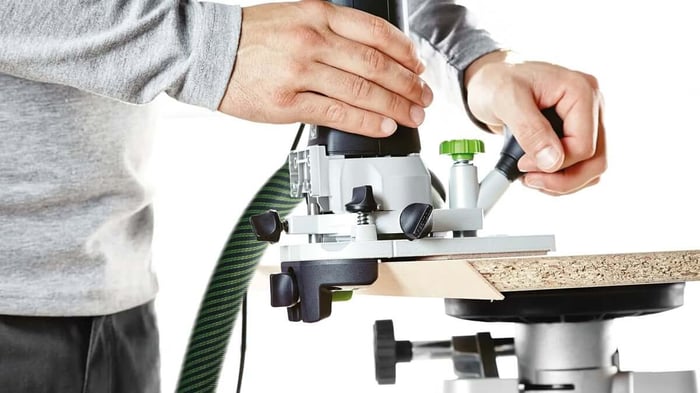
Festool MFK 700: The Premium Choice for Precision and Versatility
For professionals and serious hobbyists seeking top-tier performance, the Festool MFK 700 modular trim router stands out. Its innovative design allows for quick, tool-free base changes, enabling seamless transitions between vertical and horizontal routing. This flexibility is ideal for tasks ranging from edge banding to intricate inlay work.
Key features:
- Modular Design: Easily switch bases to go from vertical to horizontal, without tools.
- Fine Depth Adjustment: Achieve precision cuts with adjustments down to 1/256" (0.1 mm).
- Dust Extraction: Integrated systems ensure a cleaner workspace.
- Ergonomic Handling: Designed for comfort during extended use.
Whether you're trimming laminate, shaping profiles, or routing grooves, the MFK 700 offers exceptional control and accuracy. Its robust build and thoughtful features make it a worthwhile investment for those demanding the best in their tools.
FAQs
What’s the difference between a palm router, trim router, and full-size router?
Palm routers are ultra-compact and under 1 HP—ideal for light tasks. Trim routers typically offer more power and versatility for edge work. Full-size routers (3 HP+) are best for heavy-duty tasks like large dados, mortising, and shaping thick material.
Can I use a trim router for joinery?
Yes—trim routers can cut rabbets, dadoes, and even box joints with precision, as long as the material isn’t too thick. Use a straight bit and guide the router along a fence or jig.
Is a trim router suitable for soft metals?
Yes, as long as you use a solid carbide or carbide-tipped bit and take light passes. Lower your router speed and use lubrication to reduce friction. Always wear proper PPE.
What types of bits can I use in a trim router?
Most trim routers accept 1/4" shank bits. Common options include flush trim, roundover, chamfer, and spiral bits. Always verify your router’s collet size before purchasing new bits.
Is the Festool MFK 700 EQ worth it?
If you're doing edge work daily or need extreme precision, the Festool MFK 700 EQ-Set is worth every penny. Its modular design, stability, and build quality make it a long-term upgrade for any serious woodworker.