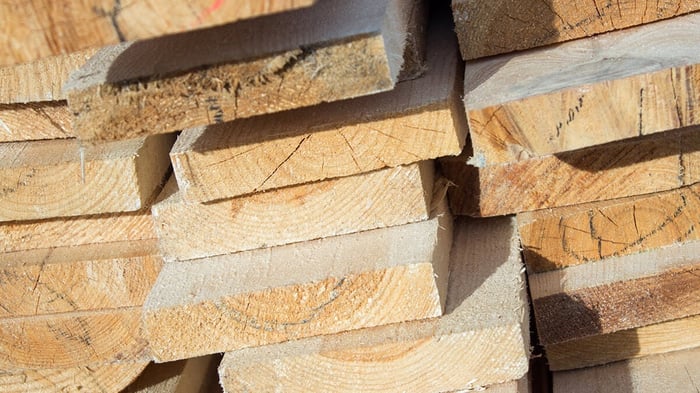
Save Money On Wood - Buy Rough Sawn Lumber
In today's economy, finding ways to save money on wood is essential to keeping projects both beautiful and budget-friendly. Wood, as a fundamental material in countless projects, from bespoke furniture to unique home decor, can quickly become one of the most significant expenses in woodworking. However, beginning with rough-sawn lumber will uncover substantial savings without compromising on quality.
What is Rough-Sawn Lumber, and, How Much Will I Save?
In woodworking and lumber processing, "S4S" (Surfaced Four Sides) lumber refers to wood that has been milled and planed smooth on all four sides. This finishing process removes the rough edges and surfaces, making the wood immediately ready for use in projects without the need for further planing or sanding by the end user. The "S4S" designation is a common lumber industry term indicating that the piece of lumber has been finished to a uniform size and is smooth on its two faces and two edges.
S4S lumber is more expensive than rough-sawn lumber. The additional cost is due to the extra processing it undergoes, including planing and finishing on all four sides to make it smooth and ready for use. This process not only involves labor but also the use of specialized machinery, which adds to the overall cost of the lumber.
The exact price difference between S4S lumber and rough-sawn lumber can vary widely depending on several factors, including the type of wood, market demand, regional availability, and the retailer. On average, you might expect S4S lumber to be anywhere from 20% to 50% more expensive than its rough-sawn counterpart. However, this is a general range, and the actual price difference can fall outside of these bounds based on the specifics mentioned above.
For example, in a scenario where rough-sawn lumber might cost around $2.00 per board foot, the S4S version of the same wood could cost between $2.40 and $3.00 per board foot or possibly more, reflecting the additional labor and processing involved.
It's also worth noting that the cost premium for S4S lumber might be justified for certain projects or in situations where the convenience of having pre-planed, dimensionally stable wood outweighs the additional expense. For hobbyists, small workshops, or projects with tight timelines, S4S lumber can save considerable time and effort that would otherwise be spent on material preparation.
Benefits of Using Rough-Cut Lumber
Call it rough-sawn or rough-cut; unfinished lumber offers several benefits for woodworking projects, appealing to both amateur woodworkers and professional carpenters. Here are some of the key advantages:
- Cost Efficiency / Lower Price Point: Rough-sawn lumber is typically less expensive than its surfaced or pre-dimensioned counterparts. Since it hasn't undergone the additional processing steps that finished lumber has, you're not paying for the labor or machine time required to plane or square the wood.
- Customization and Control
- Greater Customization: Working with rough-sawn lumber allows you to mill the wood to your exact specifications. This level of control means you can customize the dimensions to suit your specific project needs, which can be particularly beneficial for unique or non-standard designs.
- Maximize Yield: With rough lumber, you have the opportunity to work around defects such as knots or checks by strategically planning your cuts, potentially getting more usable wood out of each board.
- Quality and Selection
- Access to Higher Quality Wood: Rough-sawn lumber often comes from smaller mills that offer wood from a wider variety of species and of higher quality than what you might find at big-box hardware stores. This opens up more possibilities for selecting the perfect material for your projects.
- Better Wood Characteristics: By handling the milling process yourself, you can ensure the preservation of desirable characteristics such as figure and grain pattern, which might be lost or diminished in pre-surfaced lumber.
- Sustainability and Support for Local Economy
- Supporting Local Sawmills: Purchasing rough-sawn lumber often means you're buying from local or regional sawmills. This not only supports small businesses but also reduces the carbon footprint associated with transporting lumber long distances.
- Sustainable Practices: Smaller mills that sell rough-sawn lumber may follow more sustainable logging practices compared to large-scale operations. This can appeal to eco-conscious woodworkers looking to minimize their environmental impact.
- Educational Value
- Skill Development: Processing rough-sawn lumber requires a certain set of skills and knowledge, from understanding how to read the wood's grain to operating milling machinery such as planers and jointers. Working with rough lumber can significantly enhance your woodworking skills and deepen your understanding of the material.
- A Sense of Satisfaction / Fulfillment: There's a distinct sense of satisfaction and pride that comes from taking a rough, unfinished piece of lumber and transforming it into a beautiful, finished project. This process allows for a deeper connection to your work, from start to finish.
Equipment and Tools Needed for Working with Rough-Sawn Lumber
Working with rough-sawn lumber requires specific tools and equipment to transform it from its raw state into usable pieces for woodworking projects. Here's a brief overview:
Essential Equipment and Tools
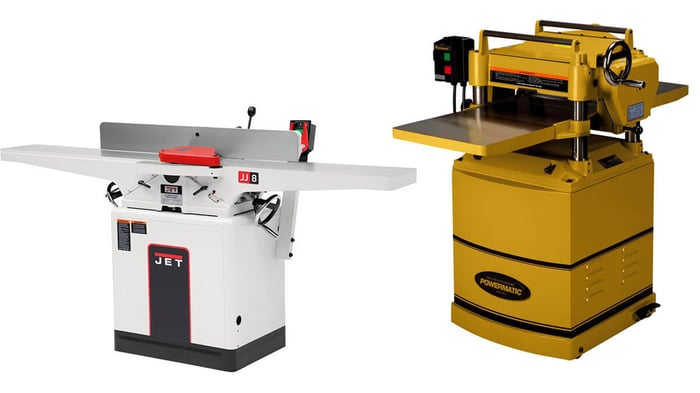
- Jointer: To flatten one face of the board and square up one edge. The jointer creates a flat reference surface, which is crucial for subsequent steps.
Key Feature: Long, flat beds and a cutter head that removes material as the board is passed over it. - Planer (Thickness Planer): To make the opposite face of the board parallel to the first face flattened by the jointer. It also brings the lumber to the desired thickness.
Key Feature: Adjustable cutting depth to control the thickness of the board with precision. - Table Saw: To rip boards to width and ensure edges are straight and parallel. Also useful for cross-cutting lumber to length.
Key Feature: A powerful motor and adjustable fence to ensure precise cuts. - Band Saw: Ideal for resawing (cutting the thickness of the board into thinner pieces) and making curved cuts. A band saw can also be used for initial dimensioning of very rough or irregular lumber.
Key Feature: Ability to accommodate wide and thick materials, with a blade that creates a narrow kerf to minimize waste.

Additional Tools for Precision and Safety
- Measuring and Marking Tools - Include: Tape measure, ruler, square (for checking angles and ensuring square cuts), and marking tools like pencils or marking knives.
Purpose: To accurately measure and mark lumber for cutting and processing. - Moisture Meter
Purpose: To measure the moisture content of the wood, ensuring it's suitable for working and will not cause issues like warping or shrinking after the project is completed. - Dust Collection System
Purpose: To manage wood dust and chips generated by power tools, keeping the workspace clean and reducing health risks associated with wood dust inhalation. - Personal Protective Equipment (PPE) - Include: Safety glasses or goggles, hearing protection, and dust masks or respirators.
Purpose: To protect against injuries and health risks from flying debris, loud noise, and wood dust.
Also Needed
- Workbench or Outfeed Table
Purpose: Provides a stable surface for inspecting, measuring, and finishing lumber. An outfeed table is particularly useful with tools like the planer and table saw for supporting long boards. - Clamps and Hold-Downs
Purpose: To secure lumber during cutting, planing, or other processing steps, ensuring safety and precision.
Tips for Selecting Quality Rough-Sawn Lumber
What to Look For
- Wood Grain and Figure
Straight Grain: Look for lumber with straight grain along its length, which generally indicates strength and stability.
Figure: Pay attention to the wood's figure, especially for projects where appearance is important. Unique figures can add beauty and value to your work. (An explanation of "figure" is in the FAQs, below.) - Moisture Content
Appropriate for Use: The lumber should be appropriately dried for its intended use. Furniture and indoor projects typically require wood with a moisture content of 6-8%, while outdoor projects can tolerate higher moisture levels. - Defects
Minimal Knots, Checks, and Splits: While some defects can add character, too many can weaken the wood. Select boards with few defects, or where defects are strategically located for your project's needs.
Avoid Warp, Cup, Bow, and Twist: Boards should be as flat and straight as possible. Minor warping can sometimes be corrected during milling, but severe deformations can make the lumber unusable for your intended purpose. - Size and Dimensions
Sufficient Thickness and Width: Ensure the boards are thick and wide enough for your project, considering any milling or planing that will reduce dimensions.
Length: Check that the boards are long enough for your needs, with a little extra to allow for end-trimming.
Questions to Ask Before You Buy
- Wood Source and Type
"Where does this wood come from?"
"What species is this, and what are its characteristics?"
Knowing the species can help you anticipate how it will behave during cutting, drying, and finishing. - Drying Process
"How was this lumber dried?" Kiln-dried wood tends to be more stable than air-dried, but both have their places depending on the project.
"What is the current moisture content?" This helps determine if additional drying is needed before use. - Storage Conditions
"How is the lumber stored?" Proper storage is critical to prevent warping and other issues. Lumber should be stored flat, supported at regular intervals, and protected from excessive moisture. - Board Selection
"Can I select my own boards?" Being able to hand-pick your lumber allows you to choose the best pieces for your project and avoid unsuitable ones. - Volume Discounts
"Are there discounts for bulk purchases?" If you're buying a large quantity, you might be able to negotiate a better price. - Return Policy
"What is your return policy for unused or defective lumber?" Knowing the return policy can save you from being stuck with lumber that doesn’t meet your needs.
By asking the right questions, you can ensure that you select high-quality rough-sawn lumber that meets your requirements. This upfront diligence will save time and resources in the long run.

Tips for Properly Storing Rough-Sawn Lumber
Storing rough-sawn lumber properly is crucial for maintaining its quality and preventing issues like warping, bowing, or developing mold. Here are the best practices for storing rough-sawn lumber to ensure it remains in good condition until you're ready to use it:
- Acclimate Your Lumber: Let it adjust to your environment. Before storing long-term, allow your lumber to acclimate to the humidity and temperature of your workshop or storage area. This process can take several weeks but is essential for minimizing future movement or distortion in the wood.
- Choose a Dry, Well-Ventilated Area Avoid Moisture: Store lumber in a dry location to prevent moisture absorption, which can lead to warping and mold. A well-ventilated area will help maintain consistent moisture levels in the wood.
- Elevate Off the Floor Prevent Contact with Concrete: Use racks or pallets to keep the lumber off the ground, especially if the floor is concrete. Concrete floors can transfer moisture to the wood and encourage warping or rot.
- Stack with Stickers for Airflow: When stacking lumber, place thin strips of wood (stickers) between each layer of boards. Ensure the stickers are aligned vertically with each other to promote even airflow and reduce the risk of warping. This spacing allows air to circulate around all sides of the lumber, which is critical for even drying and preventing mold growth.
- Keep the Stack Level Use a Flat Base: Start with a level and sturdy base for your stack to prevent the bottom boards from bending under the weight of the stack. Check that the entire stack remains level as you add layers.
- Control Weight and Pressure Even Distribution: Place weights on top of the stacked lumber to keep it flat, ensuring the weight is evenly distributed to prevent warping. However, be cautious not to apply too much weight, as excessive pressure can also deform the wood.
- Consider Covering for Outdoor Storage: If you must store lumber outside, cover the stack with a waterproof tarp to protect it from rain and direct sunlight. Ensure the covering is loose enough to maintain airflow and prevent condensation.
- Rotate the Stock: Periodically inspect and rotate your lumber, especially if it will be stored for an extended period. This helps identify any issues early and ensures that all sides of the lumber dry evenly.
- Maintain Proper Humidity Levels In humid climates, consider using a dehumidifier in your storage area to maintain optimal humidity levels for wood storage.
Proper storage not only protects your investment but also ensures that your wood is in the best condition possible for your projects.

Step-By-Step Guide to Surfacing Rough-Sawn Lumber
The general sequence and corresponding machinery for surfacing lumber are as follows:
- Inspect and Prepare the Lumber
Start with inspection: Look for any metal objects (nails, staples) in the wood that need to be removed to avoid damaging your machinery.
Consider the wood's condition: Note any warping, cupping, or twisting, as this will affect how you approach the initial milling steps. - Joint One Face Flat (Jointer)
Use a jointer first: The jointer has a flat bed and a cutter head designed to flatten one face of the board. This flat face will serve as a reference surface for further milling. Ensure the jointer is set up with the fence perpendicular to the table for accurate results. - Plane the Opposite Face Parallel (Planer)
Move to the planer: With one flat face created by the jointer, use the planer to make the opposite face flat and parallel to the first. The thickness planer allows you to achieve a consistent thickness across the length and width of the board. - Joint One Edge Straight and Square (Jointer)
Return to the jointer: After the faces are flat and parallel, use the jointer again to straighten and square one edge of the board. This edge becomes your reference edge for ripping to width. - Rip to Width (Table Saw)
Use a table saw: With a flat face down against the table and the squared edge against the fence, rip the board to the desired width. The table saw ensures that the cut is straight and parallel to the jointed edge. - Crosscut to Length (Miter Saw or Table Saw)
Final cuts for length: Use a miter saw or table saw with a crosscut sled to cut the board to the final desired length. This step might come earlier or later in the process, depending on the specific requirements of your project.
Additional Tips:
- Grain and figure consideration: Pay attention to the wood grain and figure during these steps to optimize the appearance and strength of the final pieces.
- Safety first: Always use appropriate safety gear, including eye protection, hearing protection, and dust masks. Follow all safety guidelines for each machine.
- Maintenance: Keep your machines well-maintained, with blades and cutter heads sharp and properly adjusted. This ensures the best results and extends the life of your equipment.
By following this sequence, you can efficiently transform rough-sawn lumber into smooth, dimensionally accurate boards ready for your woodworking projects. Each step is designed to build upon the work of the previous step, gradually refining the wood until it meets your specific needs.
Common Mistakes to Avoid When Working with Rough-Sawn Lumber
- Not Accounting for Wood Movement
Mistake: Ignoring the natural expansion and contraction of wood due to changes in humidity can lead to warping, cracking, or splitting in your finished project.
Avoidance: Understand the wood species you're working with and plan for wood movement in your project design. Allow for proper acclimatization of your lumber to the workshop environment before milling and assembling. - Skipping the Moisture Content Check
Mistake: Using lumber without checking its moisture content can result in unexpected wood movement after the project is completed.
Avoidance: Use a moisture meter to ensure the wood's moisture content is appropriate for its intended use. Ideally, it should be close to the equilibrium moisture content (EMC) of the environment where the finished piece will reside. - Inadequate Inspection for Metal
Mistake: Neglecting to thoroughly inspect for and remove any metal (nails, screws, staples) in the lumber. This can damage your tools, such as planer blades or saw teeth, and potentially cause injury.
Avoidance: Use a metal detector and visually inspect each piece of lumber before processing. - Inadequate Milling Preparation
Mistake: Rushing through the milling process without properly jointing and planing lumber to get it flat and square will lead to issues with fit and finish later on, not to mention possibly burning the wood.
Avoidance: Always start with jointing one face flat and one edge square, then use a planer to make the opposite face parallel.
Take your time to ensure each piece is properly prepared before moving on to assembly.
Make multiple light passes, especially when jointing and planing, to gradually reach the desired dimensions. - Ignoring Grain Direction
Mistake: Not paying attention to the grain direction when planning and making cuts. Tear-out, rough cuts, and a poor finish can result from milling against the grain.
Avoidance: Always observe the grain direction and plan your cuts to work with the grain, adjusting machine settings as needed for the best results. - Using Dull Blades or Incorrect Tools
Mistake: Using tools with dull blades or tools that aren't suited for the specific type of cut or wood being processed will lead to poor quality cuts, increased physical effort, and potentially dangerous working conditions.
Avoidance: Regularly maintain and sharpen your tools, and choose the right tool and blade for each task. - Not Allowing Extra Material for Milling
Mistake: Failing to account for the material that will be lost during the milling process (to jointing, planing, and sawing) can result in not having enough wood to complete your project.
Avoidance: Purchase slightly more lumber than your project requires to account for this material loss, commonly referred to as "waste." - Poor Storage of Lumber
Mistake: Storing rough-sawn lumber improperly can lead to warping, bowing, or other forms of distortion before it even gets used.
Avoidance: Store lumber in a dry, stable environment, stacked horizontally with stickers (thin strips of wood) between layers to allow air circulation and prevent moisture buildup. - Overlooking Safety Practices
Mistake: Neglecting safety measures when working with rough-sawn lumber and the machinery needed to mill it can result in accidents and injuries.
Avoidance: Always wear appropriate personal protective equipment (PPE), such as safety glasses, hearing protection, and dust masks. Ensure you're familiar with the operation of each machine and use push sticks or other safety devices when needed. - Misjudging the Quality of Lumber
Mistake: Selecting lumber without carefully inspecting it for defects like knots, splits, or excessive warping can compromise the quality and appearance of your project.
Avoidance: Take the time to inspect each board carefully before purchasing. Look for lumber that best suits your project's needs, considering both aesthetic and structural requirements. - Underestimating the Skill and Time Required
Mistake: Assuming that working with rough-sawn lumber is quick and easy can lead to frustration and subpar results.
Avoidance: Recognize that milling and preparing rough-sawn lumber is a skill that takes time to develop. Allocate sufficient time for the milling process, and be prepared for a learning curve.
By being aware of these common mistakes and taking steps to avoid them, you can ensure a more successful and enjoyable experience when working with rough-sawn lumber.
Frequently Asked Questions
What is “S4” lumber?
Lumber is classified based on its surface finish and the number of sides that have been planed, or finished. The term "S4S" refers to lumber that has been "Surfaced on 4 Sides," meaning all four sides have been planed smooth. Besides S4S, there are several other common grading classifications based on the surface finish:
- 1. S4S (Surfaced Four Sides): The lumber has been planed smooth on all four sides. It is ready for use in projects where the appearance of all sides is important.
- 2. S3S (Surfaced Three Sides): The lumber has been planed smooth on three sides. Typically, this means both faces and one edge are planed, leaving one edge rough.
- 3. S2S (Surfaced Two Sides): The lumber is planed smooth on two faces, leaving both edges rough. This is common for lumber that will be used in situations where the edges will be hidden or trimmed to fit.
- 4. S1S (Surfaced One Side): Only one face of the lumber is planed smooth, with the other face and both edges left rough. This type is less common but can be used for applications where only one visible surface is needed, and the rest will be concealed.
- 5. Rough Sawn or Rough Lumber: This lumber has not been planed and retains the rough texture from the sawmill. It's used in applications where the lumber will not be visible, or for a rustic appearance where the rough texture is desired.
Each grade serves different needs depending on the requirements of the project, including aesthetics, structural integrity, and cost considerations. The choice between these grades depends on how the lumber will be used, the desired appearance, and whether further finishing will be done by the user.
The primary difference between S4S lumber and rough lumber (which has not been surfaced or planed) is that S4S lumber is more convenient for immediate use in construction, cabinetry, furniture making, and other woodworking projects because it saves time and effort in preparation. However, S4S lumber is typically more expensive than rough lumber due to the additional processing it undergoes.
What is a board foot?
A board foot is a unit of measurement used in the lumber industry to quantify the volume of wood. It represents a volume of wood that is 12 inches long, 12 inches wide, and 1 inch thick, equivalent to 144 cubic inches. The board foot measurement is used primarily in the United States and Canada to price and sell lumber, providing a standardized way to calculate the cost of various sizes of wood pieces based on their volume.
To calculate the board feet in a piece of lumber, you use the formula:
Board Feet ={Length (in inches)} times {Width (in inches)} times {Thickness (in inches)} / divided by 144.
For example, if you have a piece of wood that is 6 inches wide, 2 inches thick, and 12 inches long, the calculation for board feet would be:
(6 x 2 x 12) / 144 = 1 board foot.
This measurement allows for a fair pricing system based on the actual amount of usable wood, regardless of its dimensions. It's particularly useful because lumber comes in various lengths, widths, and thicknesses, and buyers and sellers can easily calculate the volume and corresponding cost of the wood being purchased or sold.
For a handy board-foot calculator, go to WoodBin's Footulator. While you're there, check out their Shrinkulator, a wood shrinkage and expansion calculator!
What is “Figure”?
The term "wood figure" refers to the distinctive visual patterns, textures, or markings found in wood that contribute to its aesthetic appeal. These patterns are the result of various growth conditions, the way the wood is cut, and the internal structure of the wood fibers. Wood figure is highly valued in woodworking and furniture making because it adds character and beauty to the finished piece. There are several types of wood figures, each with its unique characteristics:
Types of Wood Figures
- Grain Pattern: The arrangement of the wood fibers determines the grain pattern. Straight grain is common, but wood can also have spiral, interlocked, or wavy grain patterns, which can affect both the wood's appearance and its working properties.
- Curl: This figure appears as a series of wavy lines across the wood's surface and is often seen in species like Maple. It gives the wood a three-dimensional appearance and is highly sought after for fine furniture and musical instruments.
- Bird's Eye: Characterized by small, circular or elliptical figures that resemble a bird's eye, this type of figure is most commonly found in Maple. It's valued for its unique and decorative appearance.
- Quilted: Quilted figure has a rippled texture that resembles the puckered surface of a quilt. This figure is often found in Maple and Sapele and is prized for its depth and luster when finished.
- Spalted: Spalting is a type of figure created by fungal growth in the wood, resulting in unique lines and color variations. It can add dramatic contrast and interest to the wood but must be stabilized for use in woodworking.
- Flame/Fiddleback: Seen in the back of string instruments like violins, this figure has a vertical wavy pattern that resembles flames. It's common in Maple and enhances the instrument's visual appeal and sound quality.
- Burl: A burl is a growth on a tree where the grain has grown in a deformed manner. It is characterized by a complex, swirling pattern and is highly valued for its beauty and rarity. Burls are used in veneers, inlays, and small decorative items.
- Ray Flecks: Prominent in quartersawn Oak, ray flecks are the result of cutting through the radial rays of the wood, revealing shiny, reflective flecks that add depth and character to the wood's surface.
Each type of wood figure can significantly enhance the aesthetic value of a woodworking project, making the selection of figured wood a crucial consideration for projects where appearance is a priority. The rarity and unique qualities of figured wood often make it more expensive than plain wood, but its visual impact can be well worth the cost for special projects.