Downcut, Upcut & Compression Bits
Downcut? Upcut? What's the difference?
Understanding which cutting style to use for a particular cut can make a huge difference in the quality of your projects.
ToolsToday’s Matt Plumlee breaks it down and makes it easy to decide which bit to use.

Downcut Bits
A downcut bit is the perfect choice for cuts where having a clean top surface, like creating non-through pockets, is necessary.
The down cut action of the bit cuts from the surface down ensuring that you have a perfectly clean top edge reducing any fraying or chipout that would be left if you were using an upcut bit for the same cut.
Downcut bits, however, will not leave a clean bottom edge when making through cuts as the chips are just forced down and not actually cut through on the edges.
Downcut bits also force the chips downward compacting them into the cut. This can become an issue on deeper profile cuts since the chips are not being evacuated properly causing the bit to continuously recut the same chips, resulting in excess heat and increased wear on the bit.
These bits come in all different sizes to fit your project.
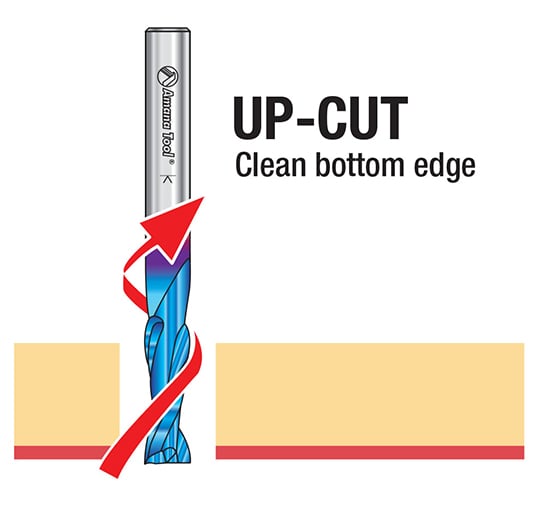
Upcut bits are the go- to choice where having a clean bottom surface or getting maximum chip evacuation on deeper profile cuts is most important.
The up cut action of the bit pulls the wood fibers up and out of the cut allowing for maximum chip evacuation; this will result in some frayed edges, typically easily cleaned up with a quick hit of sandpaper, or possibly chipout on the top surface of the material.
Because the wood fibers are being pulled up this will result in a clean bottom edge of the cut, just like the clean top edge created by the downcut bit.
More efficient chip evacuation leads to being able to run the bits at an increased feed rate, while reducing excess heat caused by recutting the same chips prolonging the life of your bit.
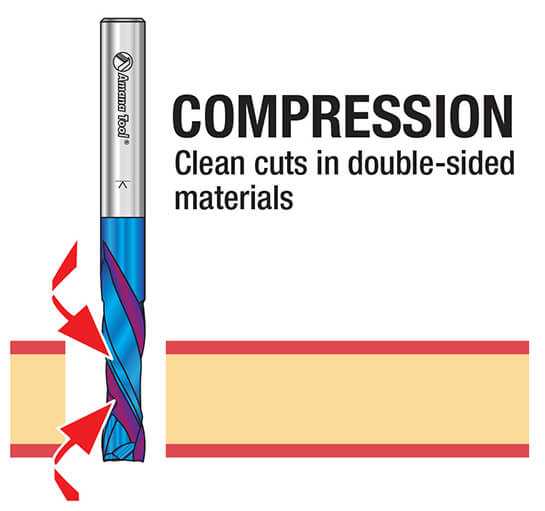
Compression bits are the best of both worlds, containing an upcut and a downcut grind on the same bit allowing you to get a clean top and bottom surface of the cut.
With compression bits, you must ensure that your first pass is below the upcut portion of the bit, otherwise you will get results similar to just cutting with an upcut bit; the downcut portion of the bit must be cutting the top surface to ensure you get the clean top and bottom surface.
Using a ramp in, plunging into the material over a distance instead of all at once, and a lead in, starting outside the design to get to the pass depth, to the cut is a great way to prolong the life of the bit and ensure that the entire piece is perfectly clean on the top and bottom.
Compression bits are designed to cut in a single pass, however, if your machine cannot handle that depth of cut you can cut in multiple passes, as long as that first pass is below the upcut portion of the bit.
While compression bits are fantastic bits, they aren’t going to replace downcut and upcut bits for every project.
If you need to cut a shallow pocket with a clean top surface, a compression bit will not be below the upcut portion and will cause fraying or chipout on the top surface.
If you’re making a very deep profile cut, the extra chip evacuation an upcut bit provides is the way to go to ensure you’re not recutting chips and putting excess wear on your bits.
Some smaller hobby style CNC machines may have a hard time taking a deep enough first pass to get below the upcut portion of the bit, in that case, it would be better to use an upcut or downcut bit for profile cuts to stay within the capabilities of your machine.
Compression bits are definitely the way to go for getting clean top and bottom surfaces of your cut when used correctly!
In conclusion, we hope that this guide has helped you understand which cutting style will suit your particular project or needs the best. We hope this will improve the outcome of your projects going forward!