Vectric Aspire Video Tutorial - Make a Personalized Picture Frame
Not sure how to use Vectric Aspire? Follow along as Jeff creates a customized picture frame, essentially giving us a tutorial in how to use Aspire.
Vectric Aspire is built on the same platform as Vectric's VCarve Pro software, with the same intuitive interface and ease of use for production design and routing.
In addition to the powerful drawing and production routing tools of VCarve Pro, Vectric Aspire also has tools to let you transform 2D sketches, photos, drawing and digital artwork into detailed 3D relief models and then to calculate 3D Roughing and Finishing toolpaths to accurately cut these shapes.
Sound complicated? It's really not. The video is 17 minutes long, but the tutorial part is only 13.5 minutes, and then you get to relax as you watch as the picture frame is carved out on the CNC machine.
All the steps are printed below the video, so you can refer back to any point.
Side Note: these make great gifts.
Watch How To CNC: Design, Cut & Engrave a Picture Frame with Vectric Aspire in fullscreen
Start [0:29]
- Draw a rectangle. Make it just a little bit bigger than the material - in this case, 19" x 19" inches - and click Apply and Close.
- Center that vector utilizing the Center in Material icon in the left hand menu.
- Now we have a vector that we can use to plane this piece of material for our picture frame.
Surfacing [1:00]
- Go to the tool path side [right-hand side menu]. Select the Pocket tool path, and select the vector that we just drew.
- Start at 0 and plane it down about 1/32 of an inch.
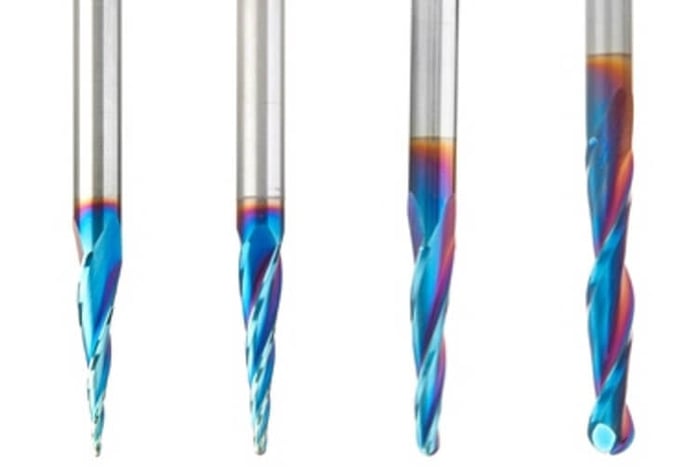
- Choose your tool: we're going to use the Amana RC-2248 which is a really neat little fly cutter / resurfacing bit.
- Make sure that your feeds and speeds are set properly based on your machine manufacturer, and click OK.
- We're going to utilize the Raster method of machining, doing a Climb cut, so that we get a little bit better surface.
- Go 90 degrees to our x-axis because you want this to flow in the direction of the grain.
- Profile pass will be last, and then click Calculate.
If you preview that tool path, you've just planed off 1/32 of an inch of your wood so that you have a really nice flat surface to work from.
Setup [2:20]
- Create a new file: The Setup is for an 18" x 18" piece of material, that's approximately 0.682 thick. The Z Zero is on the spoilboard, XY lower-left, and click OK.
Now we have our nicely machined piece of wood, our thickness is accurate to what we have on our CNC machine, and now we can begin to model the picture frame
Model the Picture Frame [2:55]
- Start with a rectangle that represents our photo. This will be a picture frame for an 8 by 10 photo and so, utilizing the Draw Rectangle function, drag out a simple rectangle.
- Utilize the sizing options within the Draw Rectangle function, & set the square to be 8" by 10".
- Click Apply and Close.
- Use the Center in Material icon to center that rectangle, that represents our photo, right in the middle of our material. Now we have a vector that represents our picture.
[3:43] That's our 8 X 10 picture, but we're going to need a little rabbet for the picture and the glass to sit in from the back of the picture frame. (We recommend MR-0101 for the rabbet.)
- Highlight the 8 by 10 picture/rectangle, and on the left side, use the offset vectors icon.
- Offset inwards about 3/8 of an inch; Create sharp offset corners; and Offset and Close.
[4:12] This will be the inner vector of our picture frame. The outer rectangle represents our picture, that's a little bit bigger, and we'll cut a rabbet 3/8" on the back, out of the picture frame (probably on the router table because this is not a two sided machining tutorial) and then we'll have a nice little rabbet for the picture to sit in.
We don't really need the outer vector anymore, because that's the vector that represents our photo. The inner vector is inside of our frame. All of this material inside that rectangle is going to be cut out.
- Highlight that "example" photo if you will, the initial outer rectangle, and delete it.
[5:00] We want a three inch picture frame.
- Select the inner vector of the frame.
- Once again utilizing the Offset Vectors icon, this time we're going to offset outwards three inches creating sharp offset corners offset and close.
Now you can see that we have what will become a three inch picture frame, with our 8 x 10 picture in the middle.
Extrude / Profile [5:32]
Now in order to model this we're going to utilize the Extrude function from within Vectric Aspire to extrude our 3d model.
In order to utilize the Extrude function to create the 3d model, you need a centerline vector. Again, just for the sake of simplicity; we have three inch thick picture frame. We know that half of that is an inch and a half
- Select the inner vector again.
- Again utilizing the Offset Outwards vector icon 1.5 inches, Creating offset corners.
- Offset and Close.
We now have a center vector that we can extrude our 3d model on.
You Need to Watch This Part [6:25]
Now that we have our vectors we're going to hop over to the modeling tab and we're going to select that vector that we have in the middle and we're going to come up here [LEFT] to our Extrude icon and we're going to use selection and now it's asking us hey what do you want to extrude along that vector.
Well I don't have anything, and that's where we get a little bit tricky. We have to decide what we want the profile of this frame to look like.
Hop back over to the drawing tab, and using the Draw Curve icon, we are going to come over here and, just utilizing this three inch span as kind of a gauge, we're going to come up 90 degrees about a half-inch, left click, then we're going to come over and down... and I'm freehanding this, not using any specific measurements or anything just kind of freehanding what I think I want this to look like and so we'll come over to there and then we'll shoot back up a little bit to there and then we'll come down to right about there... and then we'll hit our spacebar.
That stops the drawing of that curved line.
- [8:00] Then select our arrow and highlight the vector that we just drew.
- Click it twice, and just drag it over to the left a little bit, off the frame.
- Now we hop back over to our modeling tab. Choose our vector that we want to extrude along. [The centerline.]
- Select our Extrude icon, select Use selection.
- Highlight the curved line that we just drew, which we can now extrude along that vector.
- Click Apply.
[8:30] Hop over here (top tab) to the 3d view, you can see that we now have a 3d modeled picture frame.
Click start new component and close.
Return to the 2d view (top tab) and there we have our vectors and our picture frame.
Lettering / Engraving [8:49]
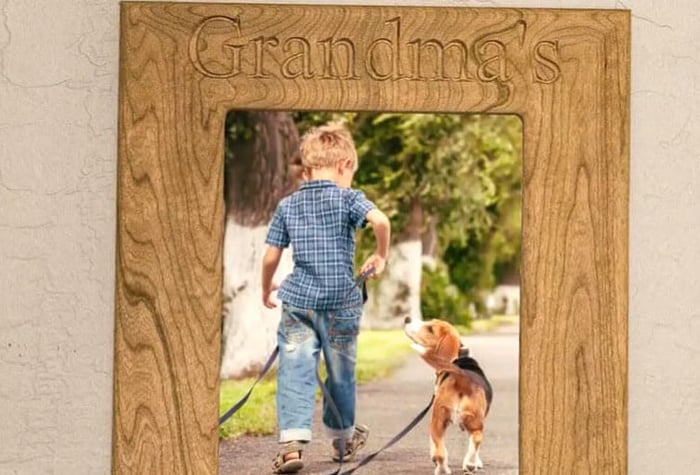
I thought it would be fun that we also engrave something into the picture frame. We'll call this Grandma's Angels.
[9:00] "Grandma's"
- Return to the drawing tab.
- Using our text tool, Draw Text let's first type out "Grandma's." We'll use a true type Times New Roman font for simplicity. Click Apply.
- Because I had my anchor position at X and y 0, "Grandma's" is down here in the bottom.
- We'll select Close and then we'll drag "Grandma's" up into the center.
- Hold down the shift key while clicking the left mouse button, click on one of the boxes around the text. Drag it to make the text just a little bigger.
[9:40] We're going to do the same thing for "Angels."
- Using our text tool type out the word "Angels" and again we'll use the Times New Roman.
- Anchor at 0 0 and Apply and Close.
- Then again, we'll click it again, drag it into position, holding shift left click and dragging outwards and we'll make that just a little bit bigger.
Roughing Tool Path [10:12]
- Select our inner vector, our outer vector and then come up here and use the 3d roughing tool path icon.
- We're going to select the Amana 46321 quarter-inch 2 flute up-cut bit.
- Make certain that your feeds and speeds are accurate based on the machine that you're using.
- Select Okay.
- We're going to model within the 2 selected vectors.
- Come past the vector an eighth of an inch - so I'm gonna go eighth inch past this vector here - and an eighth inch in this vector here - just to make sure that we've got a nice crisp edge on our roughing pass machining allowance I'm going to leave 0.06 for my finishing pass.
- We're going to 3d Raster along the y-axis and calculate.
- It's just letting me know that that .06 machining allowance is greater than 20% of my tool diameter, which is okay in this particular case, and there I have my roughing tool path.
[11:15] If I preview that you can see that we've got a roughing path of our picture frame and this is that little eighth inch that we went past the frame. Select Close.
Finishing Tool Path [11:28]
- Return to the 2d view, with those two vectors still selected, we're going to use the finishing toolpath icon and we're going to use the Amana's 46282 5.4 degree tapered ball nose.
- Again make sure your speeds and feeds are accurate.
- We're going to Raster 3d finish and Calculate.
- [11:55] Now we need to engrave Grandma's Angels.
- We're going to click on "Grandma's," hold shift, click on "Angels," and then utilizing the V carve engraving tool path, we're going to go about an eighth inch deep.
- We're going to use Amana's 45705 60 degree half-inch V bit
- Again make sure that your speeds and feeds are accurate.
- Click OK
[12:25] This is very important: We want to make sure that we project the tool path onto the 3d model, and click Calculate.
Cut-Out Tool Path [12:35]
- We have to do two cut-out passes, one for the inside, and one for the outside.
- On the inside, we want to cut inside the vector, and on the outside, we want to cut outside the vector.
- We'll do the inside one first.
- Choose Profile tool path.
- We want to cut all the way through, which is 0.682.
- We're again going to utilize the Amana 46321.
- [13:00] We're going to go on the inside of the vector.
- We're going to add a couple of tabs here
- Edit the tabs.
- We'll put 4 tabs just to hold the material, when it cuts that out we don't want it flopping around, so the tabs will hold it in place.
- Close.
- Our tabs are going to be a half inch wide, eighth inch thick, and we'll name it Profile 1 Inside, and Calculate.
- [13:30] We'll add tabs to the outside of the frame as well. Edit the tabs. We'll again put two on either side to make sure that our frame doesn't become disengaged from the material.
- We'll call this Profile 2 Outside, and, click Calculate.
Now if we preview that visible tool path we've got a nice picture frame. Grandma's Angels, that we can machine out and put a picture in.
Now for the Eye-Candy [14:00]
This resurfacing bit from Amana Tool just does a fantastic job of leaving just a smooth finish I got to tell you if we weren't modeling this using 3d model there would be very little sanding of any needing to be done it just left a marvelous finish no burning none of that purple color that you get sometimes with cherry. This is just a great resurfacing bit whether it be your spoilboard or you want to plane a work piece.
These next couple of clips are going to be the roughing tool path utilizing the Amana Tool 46321 from ToolsToday. It's a two flute spiral up cut bit. As you watch the clips you'll see how this too just leaves just a beautiful finish, cuts clean, no burning. just a great two flute up cut bit from Amana Tools.
Time to do some finishing this is the Amana Tools number 46282. It's a 5.4 degree taper ball nose with a quarter inch shank, ZrN coated. I just can't say enough about the finish that this leaves.
For V carving Grandma's Angels we're going to use the Amana Tool number 45705. It's a 60 degree V bit that's a half inch wide, with a quarter inch shank to fit most hobby CNC machines.
We'll get Grandma's Angels carved out, then we'll cut the frame out, and have a look.
With that all done it's time to cut it out with number 46321 two flute spiral up cut bit.
We're going to cut out the middle of the frame, cut out the outer frame, and then we'll have a look at the completed frame in all its glory.
[16:30] Tada! There it is, in all its glory, the completed Grandma's Angels frame, modeled in Vectric Aspire and machined utilizing Amana Tools from ToolsToday.
You May Also Like:
Watch How To Download & Search Vectric Tool Files in fullscreen.
Access our free Vectric® Compatible CNC Tool Files.