Achieve perfect alignment with every blade in your shop.
Changing saw blades effectively changes the distance from the blade to the fence, making the fence scale inaccurate, and your riving knife dangerously misaligned. BLADEMATCH Arbor Shims offset variation in blade thickness, aligning every blade to the same cut line.
Table saw calibration made simple.
- Package includes 6 shims: 0.003, 0.004, 0.005, 0.006, 0.010, and 0.020” in thickness.
- Combine shims to calibrate blade cut line from 0.003 - 0.045” in 0.001” increments.
- Includes easy step-by-step instructions.
So accurate, you'll be splitting atoms.
Step 1: Calibrate your saw’s fence scale and riving knife with your thickest blade, then cut a test piece.
Step 2: Without moving the fence, cut test pieces with thinner blades, and measure the difference between them and the test piece cut with your thickest blade.
Step 3: Combine arbor shims to equal the measured difference.
Step 4: Add Install Arbor Shims and watch your thin kerf blade magically align to the same cut line as your default blade.
Step 5: Make note of the shim combination needed for future reference.
Specifications:
- Included in the box
- 0.003" Shim
- 0.004" Shim
- 0.005" Shim
- 0.006" Shim
- 0.010" Shim
- 0.020" Shim
- Weight: 0.1lbs
- Package Dimensions: 3.0" x 3.0" x 0.1"
- Calibration Range: 0.003 - 0.045” in 0.001” increments (callibration)
- Requirements: Table Saw
- SKU: AS-6
- UPC: 815267010668
- Country of Origin: Designed in the USA; Made in Taiwan
- Patent #: D847228


")
")
")
")
")
")


")


")


")
 Download Manual Instructions
 Introducing The BLADEMATCH Arbor Shims™ by MICROJIG
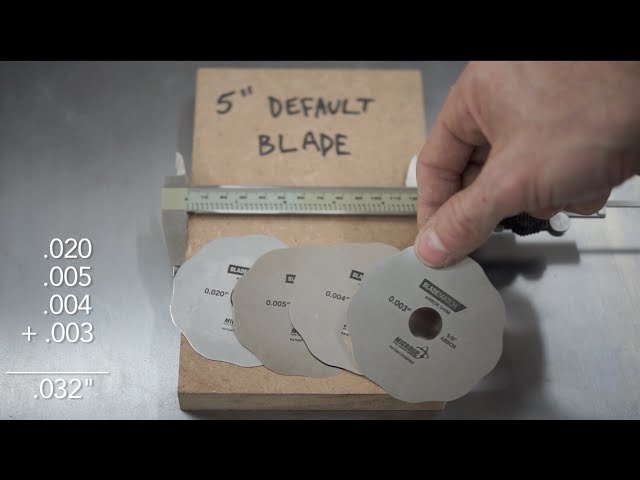 The BLADEMATCH Arbor Shims | Instructional Video