 WARNING!
 The max RPM for the Dynamically Balanced non Random Orbital Sander is 8,000. Working with higher rotation speed can cause damage to the machine spindle.
Please Note: After one hour of sanding, stop and turn the power off on your CNC machine. Inspect to ensure the tool spins freely. Repeat after each hour of sanding.
Shop the 4" diameter IN-SAND™ CNC sander here.
IN-SAND™ Dynamically Balanced Non-Random Orbital CNC Sander 3/4" Shank Key Benefits:
- Dynamically Balanced
- Consistent Surface Quality
Delivers uniform sanding results and smooth, repeatable finishes directly from your CNC.
- Hands-Free Operation
Eliminates much of the manual sanding to remove tool marks, saving time while improving surface prep.
- Efficient Dust Collection
Connects to your CNC’s dust collection system, reducing airborne dust and exposure.
- Minimal Material Handling
Surfacing, milling, and sanding in one setup for faster, more accurate results.
- Finish-Ready Prep
Leaves a clean, even surface ready for final sanding with a random-orbit sander.
- Designed for CNC Sanding: Wood and Resin.
- Includes 20 Replacement Sandpaper Discs
You must adhere the sandpaper to the pad before using the sander on your material. 10 Pcs of 80 grit (Medium) and 10 Pcs of 120 grit (Fine).
- Full-Color Instructions Included
UNDERSTANDING YOUR CNC SANDER BEFORE USE:
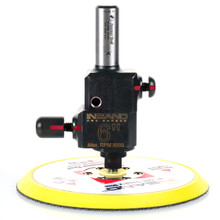
Amana Tool® IN-SAND™ CNC Sander is a precision-engineered, non-random orbital CNC sanding tool designed for sanding wood and resin surfaces. They feature a 3.5mm orbital stroke and a 1/2" shank (#61299) or 3/4" shank (#61336 & #61336), making them compatible with many CNC machines. The sander is dynamically balanced to ensure smooth operation and reduce vibration during use.
IN-SAND™ Dynamically Balanced Non-Random Orbital CNC Sander designed to use with any sanding disc (included) according with the finish required.
The In-Sand™ is a non-random orbital sander, which operates in a fixed, predictable motion. The sander should not be used to flatten uneven surfaces, the surface must already be flat before sanding. The sander is dynamically balanced from the factory using the counterbalance screw as the balancing element.
DO NOT ADJUST COUNTERBALANCE SCREWS. Ensure the red marks are aligned to the tool body.
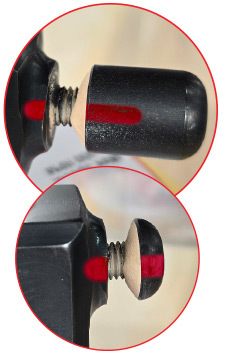 If the red mark on counterbalance screws are not aligned properly to the red mark on the tool body, please email our technical support team for assistance at [email protected].
Note: After one hour of sanding, stop and turn the power off on your CNC machine.
• Inspect to ensure the tool spins freely and the sanding pad is in good condition.
• If build up of dust is on the counterbalance screws, clean off with a brush or air pressure. Repeat after each hour of sanding.
After a Few Hours of Use
• Stop the machine, wait 15 minutes for the tool to cool off.
• Remove the tool from the spindle.
• Ensure the balance weights are aligned to red mark.
• Check to see if the sanding pad can be pushed up without any resistance (about 0.1").
• While the pad is pushed up, check to see it can still be rotated easily. If build up of dust is on the weights, clean off with a brush or air pressure.
Heavy Duty Spring, Pre-Installed.
Each unit is equipped with a single spring system, allowing you to control sanding intensity by adjusting the Z-axis pressure. Apply more pressure for rough sanding or lighten the pressure for finer finishing, giving you full control over surface quality and material removal.
Setup at the CNC Machine:
Pocket Toolpath Setup
- We recommend a pocket toolpath, with an 80% stepover running with the grain of the wood. Between each pass, ensure the sander raises which allows dust to evacuate before starting the next pass.
- A pocketing toolpath is important because it does a pass over the entire surface, gets to the end point, raises (allowing dust on the sanding disc to evacuate) and moves back to the start point to begin the next pass.
- You may need to adjust the feed rate and spindle RPM to get the desired sanding result with the grit of sandpaper you are using.
- Multiple passes with each grit may be needed for desired results.
Sandpaper Grits
Knowing which grit sandpaper to use depends on the type of job and what step in the process you are in. The lower the grit numbers, the coarser the disc will be, and the higher the grit, the finer it will be.
- 80 grit: Coarse, Heavy material removal. Used for stripping paint, smoothing rough wood. Great for initial sanding of very rough surfaces.
- 120 grit: Medium, Smooths surfaces after 80 grit. Good for prepping wood before finer sanding. Often used before priming or staining.
- 150 grit: Medium Fine, Refines the surface after 120 grit. Used for light smoothing and general sanding before finishing.
- 180 grit: Fine. Prepares wood for final finishing. Removes small scratches left by 150 grit. Good for sanding before applying stain or primer.
- 220 grit: Extra Fine. Final sanding before finishing. Also used between coats of finish like polyurethane or paint for a smooth, professional result.


 WARNING: Drilling, sawing, sanding or machining wood products can expose you to wood dust, a substance known to the State of California to cause cancer. Avoid inhaling wood dust or use a dust mask or other safeguards for personal protection. For more information go to www.P65Warnings.ca.gov/wood.
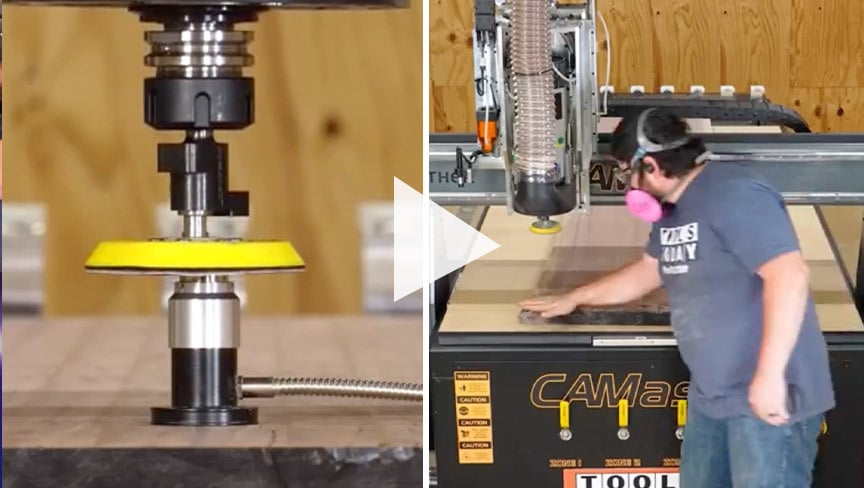 CNC Sanding Attachment Amana Tool In Sand Sander


